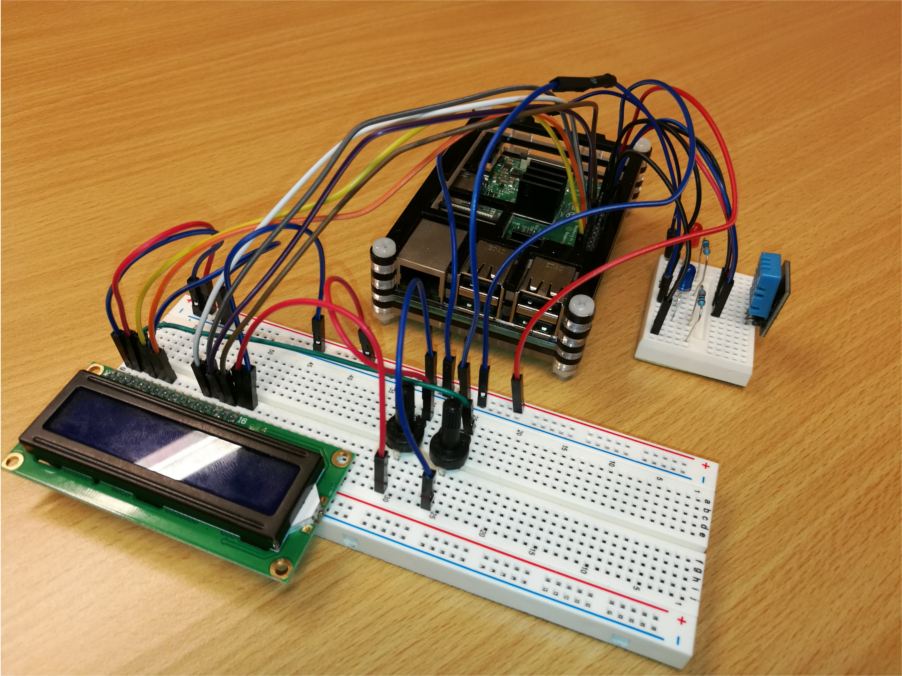
DHT11 on lämpötila ja ilmankosteussensori. Kytkin sen Raspberry Pi 3 Model B:n ja 1604 LCD-näytön kanssa. Lisäksi sininen ja punainen palavat sen hetkisen lämpötilan mukaan.
LED:ien digital out jalat on kytketty 330 ohm:n etuvastuksiin (resistor). LCD-näyttöä hallitsee kaksi potentiometriä, joista toinen säätää näytön kirkkautta, ja toinen sen saturaatiota.
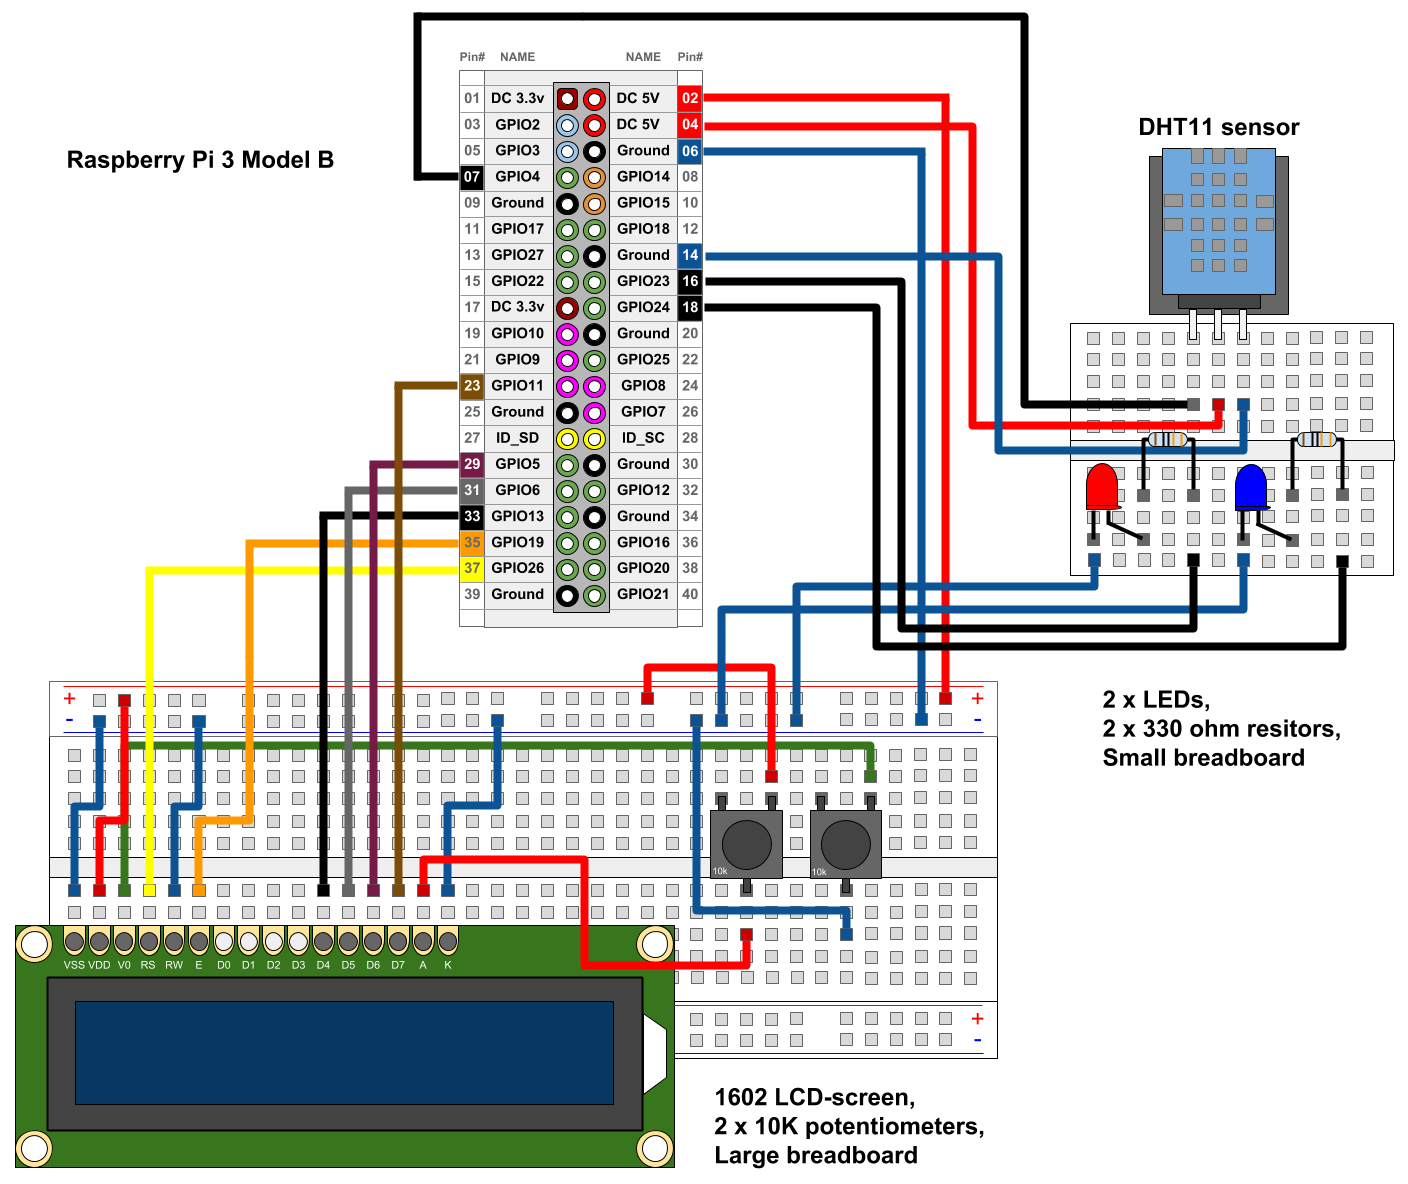
Kytkentäkaavio on piirretty Google Drawings-ohjelmalla. Jatkossa käytän kyllä Fritzingiä, joka on avoimen lähdekoodin ohjelma kytkentäkaavioiden ja piirisarjojen suunnitteluun: http://fritzing.org/home/.
Merkkaan kytkentäkaavioissa johdot seuraavasti:
Siniset johdot = maadoitus (ground)
Punaiset johdot = 5V power
Mustat johdot = Digital output
Muut värilliset johdot = Digital output
Käytetyt osat:
| Kappalemäärä | Osan nimi |
|---|---|
| 1 | Raspberry Pi 3 Model B |
| 1 | DHT11 temperature and humidity sensor |
| 1 | 1602 LCD-screen with 16 pins |
| 2 | 10K potentiometer |
| 2 | 330 ohm Resistor |
| 2 | LED |
| 1 | Large Breadboard |
| 1 | Small Breadboard |
| A lot | Jumper Wire |
Käytetyt kirjastot:
- time
- sys
- Adafruit_CharLCD
- Adafruit_DHT
- RPi.GPIO
Lähdekoodi:
Esimerkkikoodi löytyy GitHubista: https://github.com/PyhaMarkus/dht11-lcd
#!/usr/bin/python
# -*- coding: utf-8 -*-
# Display DHT11 temperature and humidity sensor data on an LCD with the Raspberry Pi 3
# Markus Pyhäranta 2018.

#Import libraries
import time
import sys
import Adafruit_DHT
import Adafruit_CharLCD as LCD
import RPi.GPIO as GPIO

# Define Raspberry Pi pin setup - Note: numbers refer to the GPIO numbers and not the number of the physical pins
lcd_rs = 26
lcd_en = 19
lcd_d4 = 13
lcd_d5 = 6
lcd_d6 = 5
lcd_d7 = 11
lcd_backlight = 2

# Define LCD column and row size for 16x2 LCD
lcd_columns = 16
lcd_rows = 2

# Initialize the pins by calling a class
lcd = LCD.Adafruit_CharLCD(lcd_rs, lcd_en, lcd_d4, lcd_d5, lcd_d6, lcd_d7, lcd_columns, lcd_rows, lcd_backlight)

#Set the naming convention for pins. Refer to pins with their names e.g GPIO23 and not the physical number of the pin.
GPIO.setmode(GPIO.BCM)
#No warning messages on screen
GPIO.setwarnings(False)
#GPIO pins that are used to output data for the LEDs
GPIO.setup(23,GPIO.OUT)
GPIO.setup(24,GPIO.OUT)


# The actual program starts here - Run this over and over again
while True:

humidity, temperature = Adafruit_DHT.read_retry(11, 4)

sensorValue = 'Humidity: {0:0.1f} %\nTemp: {1:0.1f} C'.format(humidity, temperature)

# Red LED if humidity values are over 45. Blue LED if not.
if temperature >= 25:
GPIO.output(23,GPIO.HIGH)
GPIO.output(24,GPIO.LOW)

else:
GPIO.output(24,GPIO.HIGH)
GPIO.output(23,GPIO.LOW)


#Text to be displayed on the LCD
lcd.message(sensorValue)
#Sleep 5 seconds
time.sleep(5.0)
#Clear the screen
lcd.clear()

# Start over.
Asennus:
Adafruit DHT -kirjaston asennus
sudo apt-get update
sudo apt-get install git
git clone https://github.com/adafruit/Adafruit_Python_DHT.git
cd Adafruit_Python_DHT
sudo apt-get install build-essential python-dev
sudo python setup.py install
RPLCD -kirjaston asennus
sudo pip install RPLCD
Python koodin lataus ja asennus
git clone https://github.com/PyhaMarkus/dht11-lcd.git
cd dht11-lcd
Tee tarpeelliset muutokset koodiin ja aja se komennolla:
python dht11_lcd.py
Käytetyt lähteet:
http://www.circuitbasics.com/how-to-set-up-the-dht11-humidity-sensor-on-the-raspberry-pi/https://pimylifeup.com/raspberry-pi-lcd-16×2/
Moi
Mikähän on syynä kun Adafuit_DHT -kirjaston asennus ei onnistu edes juuri asennetulle Rasp 3B:lle kun seuraa “kopiontarkasti” sivulla olevaa latausjärjestystä?
Näytti uusi Rasp-versio olevan 3.9.
Tuohon asti menee kivuttomasti.
RASP@raspberrypi:~/Adafruit_Python_DHT $
RASP@raspberrypi:~/Adafruit_Python_DHT $ sudo python setup.py install
Traceback (most recent call last):
File “setup.py”, line 1, in
from setuptools import setup, find_packages, Extension
ImportError: No module named setuptools
RASP@raspberrypi:~/Adafruit_Python_DHT $
Setuptools-modulia ei löydä.
Sain pari kertaa jo koneen jumiin kun olin siihen jo mm. 2-rivisen i2c:llä kytkettyn näytönkin laittanut ja se pelasi, niin tein sitten taas uuden puhtaan asennuksen ja ihan ensimmäisenä kokeilin kirjaston asennusta.
Olen kokematon Rasp:n kanssa.
Ohjelmointia tein kyllä työksenikin Nokian verkkopuolella aikoinaan, mutta siitä on jo vuosikymmeniä. Nyt olisi tarkoitus hieman Rasp:n varaan viritellä toimintoja ja siksi testailen eri laitteiden liittämistä ja kommunikointia.
Tämä DHT11 sensori sattui käsiin, ja onhan se yksi vaihtoehto lämpötilan mittailuun.
Lontookin taipuuu kohtalaisesti, mutta kun satuit olemaan suomalainen, niin kysympä siksi kotimaisella. Oulussa asustelen
Hei,
Virheilmoituksen perusteella sinulla ei ole setuptools-modulia asennettuna. Huomaa, että tämä blogikirjoitus on useita vuosia vanha. Tuolloin käyttämäni Adafruit_Python_DHT -sensorikirjasto on jo nykyään vanhentunut, eikä sitä kehitetä. Se todennäköisesti toimii yhä, mutta sen asennusskriptin ohjelmistoriippuvuudet ovat muuttuneet. Ks. tarvittavat ohjelmistoriippuvuudet täältä: https://github.com/adafruit/Adafruit_Python_DHT#installing
Jos tarvittavia riippuvuuksia ei ole asennettu, asenna ne ensin. Kommenttisi perusteella käytit Python 2 -versiota, jolloin tarvittavien riippuvuuksien asennus onnistuu seuraavasti:
sudo apt-get update
sudo apt-get install python-pip
sudo python -m pip install –upgrade pip setuptools wheel
Sen jälkeen voit kokeilla asentaa Adafruit_Python_DHT-kirjaston uudelleen:
sudo python setup.py install
Kirjaston pitäisi myös löytyä apt-paketinhallinnasta nykyään valmiiksi, eli halutessasi voit asentaa sen seuraavasti:
sudo pip install Adafruit_DHT
Uusi suositus on nähdäkseni käyttää CircuitPython-kirjastoa Adafruit_Python_DHT -kirjaston sijaan. Jos haluat kokeilla uudella kirjastolla, niin asennusohjeet ja esimmerkkikoodi löytyy täältä: https://learn.adafruit.com/dht-humidity-sensing-on-raspberry-pi-with-gdocs-logging/python-setup
Ystävällisin terveisin,
Markus Pyhäranta
Kiitos.
Huomasin itse tänään että juuri tuo Python versio kirjastoineen voi olla syynä. Minulla on käytössä 3.9 ja silloin lienee osoitukset hieman muuttuneet. Sijoituksissa lienee eroja.
Huomasin tänään tuon CircuitPythonin, mutta olen juuri kokeilemassa vielä tuolla sinun ohjeella mutta 3:lle modattuna kirjastojen latausten suhteen. Tosin en odota liikoja – pitänee tutkailla tuota vaihtoehtoa seuraavaksi.
Kiitos, kuittaan jossain vaiheessa miten käy.
Seppo